In short
- Start with System Settings › General › Storage: it shows what uses space and offers Store in iCloud, Optimize Storage and Empty Trash Automatically.
- The quickest wins are usually the Trash, the Downloads folder, unused apps and old iPhone or iPad backups.
- Developers and people who run local AI models often find tens of gigabytes in build caches, simulators, Docker disks and model files.
- Remove files with the tool that created them where possible, and keep a recent backup before any large clean-up.
- Some space, such as local snapshots and purgeable data, is managed by macOS and comes back on its own.
How to free up space on a Mac
- Back up and check your storage. Make sure you have a recent Time Machine or other backup, then open System Settings › General › Storage to see which categories use the most space.
- Apply Apple’s recommendations. Review Store in iCloud, Optimize Storage and Empty Trash Automatically in Storage settings and turn on the ones that suit you.
- Empty the Trash and clear Downloads. Empty the Trash, then sort Downloads by size and remove installers, disk images and archives you no longer need.
- Remove apps you do not use. Click the Info button next to Applications in Storage settings, sort by size or last opened, and delete apps you no longer use, including old macOS installers.
- Delete old iPhone and iPad backups. In Finder, select your device and click Manage Backups, or use the iOS Files category in Storage settings, and delete backups you no longer need.
- Clean developer and AI files with their own tools. Clear Xcode DerivedData and old simulators, prune Docker, remove unused node_modules folders and delete local AI models you no longer use.
- Slim down media libraries. Turn on Optimize Mac Storage in Photos, remove downloaded TV and music you can stream again, and move large libraries to an external drive.
- Restart and recheck. Restart to release swap and temporary files, then check Storage settings again. Allow up to 24 hours for local snapshots to expire.
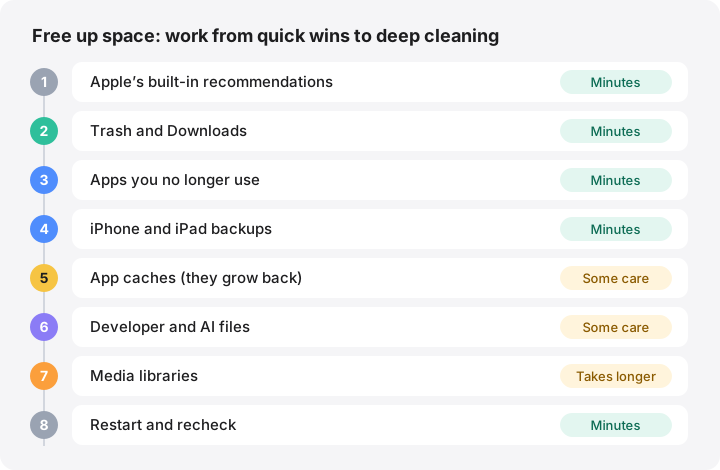
To free up space on a Mac, work from quick wins to deep cleaning: check Storage settings, use Apple’s built-in recommendations, empty the Trash and Downloads, remove unused apps and old iPhone backups, then deal with specialised piles such as developer caches, AI models and media libraries. Most people recover the bulk of their space in the first five steps. This guide follows that order and links to a detailed guide for each topic.
Everything here works on macOS 27 Golden Gate, macOS 26 Tahoe, macOS 15 Sequoia and macOS 14 Sonoma unless noted. As of October 2026, macOS 27 runs only on Apple silicon; Intel Macs stay on macOS 26.
Before you start: back up and look
Make sure you have a recent backup, with Time Machine or another tool. Then open System Settings › General › Storage. The bar at the top splits used space into categories, and the Info button (ⓘ) next to many of them opens a list you can act on. Apple explains each category in its Storage settings guide.
If one category dominates, jump to the matching step below. If System Data is the largest, read what System Data is first, because it needs a different approach.
Step 1: Use Apple’s built-in recommendations
Storage settings offers three recommendations, described in Apple’s optimise storage guide:
| Recommendation | What it does | Worth knowing |
|---|---|---|
| Store in iCloud | Moves Desktop and Documents to iCloud Drive, photos to iCloud Photos and messages to iCloud; keeps only recent files locally when space is needed | Uses your iCloud storage plan |
| Optimize Storage | Removes Apple TV movies and shows you have watched, and keeps only recent email attachments | You can download them again |
| Empty Trash Automatically | Erases items that have been in the Trash for more than 30 days | You can turn it off later in Finder settings |
macOS also clears some caches, logs and staged updates by itself when space runs low. That is part of why the free-space figure moves on its own.
Step 2: Empty the Trash and clear Downloads
Files in the Trash still use space until you empty it. Open the Trash, check nothing important is there, and choose Finder › Empty Trash. External drives keep their own Trash, which empties at the same time while the drive is connected.
Then open Downloads, switch to list view and sort by Size. Disk images (.dmg), installer packages (.pkg) and archives (.zip) are usually safe to delete once the app they contained is installed. In Mail, Mailbox › Erase Deleted Items and Mailbox › Erase Junk Mail remove messages already in those mailboxes.
Step 3: Remove apps you no longer use
In Storage settings, click ⓘ next to Applications. You can sort by size and by last opened date. Two items are easy to miss:
- macOS installers, such as an “Install macOS” app left in Applications after an upgrade. They can be large and you can download them again.
- Leftover app data in your Library after an app is gone. Our guide to uninstalling Mac apps completely shows where it lives and what to keep.
Step 4: Delete old iPhone and iPad backups
Local device backups can be large. In Finder, select your iPhone or iPad in the sidebar, click Manage Backups, then Control-click a backup and choose Delete. Apple documents this in Locate and manage backups. Keep at least one recent backup of each device you still use. The iOS Files category in Storage settings also lists backups and firmware (IPSW) files you can remove.
Step 5: Clear caches, carefully
App caches in ~/Library/Caches are generally safe to delete with the app closed. They are rebuilt as you use the app, so the gain is often temporary. Focus on the large ones, such as browser caches or a creative app’s media cache, rather than emptying everything. The App caches page lists common examples. Leave system caches outside your home folder to macOS.
Step 6: Developer and AI files
If you write code or run models locally, this step often frees the most space. Use each tool’s own command where it has one.
- Xcode: DerivedData, old simulators and device support files. See cleaning Xcode DerivedData, simulators and device support.
- Docker Desktop: one disk image holds every image, container and volume. See Docker Desktop’s disk image.
- JavaScript projects:
node_modulesfolders in old projects can be deleted and reinstalled. See node_modules clean-up. - Homebrew: old versions and downloads. See Homebrew clean-up.
- Local AI models: Ollama, LM Studio and Hugging Face downloads can each be several gigabytes. See local AI model storage.
Step 7: Slim down media libraries
- Photos: with iCloud Photos on, choose Photos › Settings › iCloud › Optimize Mac Storage to keep smaller versions locally. Deleted photos stay in Recently Deleted until you empty it or the waiting period ends.
- Music, TV and Podcasts: remove downloads you can stream or download again.
- Messages: in Storage settings, click ⓘ next to Messages to review large attachments.
- Files already in iCloud Drive: Control-click and choose Remove Download to free the local copy without deleting the file. Our guide on Remove Download versus delete explains the difference.
- Large libraries you rarely open, such as Photos, Final Cut Pro or iMovie libraries, can live on an external drive. Apple suggests this in Free up storage space on Mac.
Avoid deleting “duplicates” by hand on APFS drives: many copies are clones that share space, so removing them frees little.
Step 8: Restart and recheck
A restart releases swap files and temporary data. Then check Storage settings again; it can take a moment to recalculate. If the number barely moves, the usual reasons are covered in why deleted files don’t free space. Two related areas are managed by macOS itself:
- Local Time Machine snapshots keep recently deleted data for up to 24 hours.
- Purgeable space is counted as available by Finder but not by Terminal’s
dfuntil macOS releases it.
What not to do
- Do not delete anything in
/System, or folders under/privateand/Libraryyou do not recognise. The folder directory explains common locations. - Do not rely on one-click tools that hide what they remove. You should always be able to see and undo a deletion.
- Do not expect cleaning to make a Mac faster or “free RAM”. Freeing storage helps with updates, downloads and swap, not with general speed.
If you are preparing for a system update, see how much space a macOS update needs, and use the Mac storage calculator to plan a new Mac.
How MoreRoom helps
MoreRoom’s free version scans your Mac locally and shows where space goes in treemap, rings and list views. Its 249 rules recognise items covered in this guide, from Downloads installers and iPhone backups to Xcode, Docker and AI model folders, with “Safe to remove” or “Review first” badges. You can uninstall apps one at a time with their leftovers, free local copies of cloud files one folder at a time, and move items to the Trash one by one, with Undo. Pro adds Collector, Goal mode (“I need 40 GB”), project hibernation for developers, and Free Without Deleting: identical files share their space as APFS clones and files unused for two months are compressed, with every file kept in place. MoreRoom does not delete duplicates or snapshots.
Frequently asked questions
What is the fastest way to free up space on a Mac?
Empty the Trash, clear large files from Downloads and delete apps you no longer use. These three steps take minutes and are easy to undo before you empty the Trash.
Is it safe to delete caches on a Mac?
Caches in your user Library are generally safe to delete once the app is closed, because apps rebuild them. The space comes back as you use the apps, so caches are rarely a lasting fix.
Why did freeing space not change my storage figure?
Files may still be in the Trash, open in an app, kept by a local snapshot or shared with an APFS clone. Storage settings can also take a while to recalculate.
Does Store in iCloud delete my files?
No. It moves Desktop and Documents to iCloud Drive and keeps only recently opened files on your Mac when space is needed. The files count against your iCloud storage plan.
How much free space should a Mac have?
Enough for macOS to work and update comfortably. Apple does not publish one figure for every Mac, so see our guide on how much free space a Mac needs for practical ranges.
Should I use a cleaning app?
You can free a lot of space with Apple’s tools and Finder alone. A storage app helps you see where space goes and recognise what is safe to remove, but avoid any tool that deletes without showing you what it removes.